
|
John A. Weeks III
Thursday, July 16, 2026, 7:19:48 PM CDT |
|||
| Home | Photo Tours | Rail Fan | 12 Easy Steps |
| Aviation | Spacecraft | Highways & Bridges | About The Author |
|
|
|
|||||||||||||||||
How To Watermark Digital Photos
Introduction
Like many photographers, I have a large collection of photographs that I have taken over the years. I have many of these photos available on the Internet at my personal website. I don't mind sharing these photos for nonprofit and educational uses, but do get upset when people simply steal a photo without asking for permission. I also ended up with a problem where people were taking my photos and representing them as their own work and attempting to sell them to other organizations. To address these issues, I decided to watermark each of my photos. This will hopefully remind people that these photos are my property, and while they may look and enjoy, they should not take without permission.
Types Of Watermarks
Traditional Watermark — A traditional watermark is an image that is molded into a piece of paper. Organizations, especially banks, would have paper manufactured with their own unique watermark molded right into the paper. Anyone who handled a document from the bank could look for the watermark, and verify if the document was authentic. Digital Watermark — A digital watermark is a digital signature or pattern of bits that are impressed into an image file that can be read by a viewing utility. A person viewing the file might not see the watermark, but the watermark stays intact even if the file is cut, cropped, or otherwise manipulated. This is a very secure method of watermarking an image, but it is also a difficult algorithm to implement such that the digital signature does not alter the image. Visual Watermark — A visual watermark is a logo or other marking that is added to an image to allow the owner to identify his or her ownership of the photo. The watermark may be placed in the center of the image so that it remains even if someone cuts and crops the photo, but a watermark in the middle of a photo makes it hard to enjoy looking at the photo. Others put the watermark on the edge. This method can be defeated by cropping the photo. In this exercise, I have decided to use a visual watermark, and place it in the lower right side of each photo.
Create The Watermark Image
While there are all kinds of freeware and commercial software packages designed to add watermarks, I prefer a method that I can fine tune at the command line, runs on multiple platforms, and can be automated. For example, if you have 1000 photos in 20 different folders, you don't want to have to navigate to each of these folders and click for each photo. The tool that I picked is the ImageMagick suite of image manipulation tools. These tools are available on UNIX, Linux, Mac OS/X, and Windows. They work the best on machines that support a command line shell such as bash. For my watermark image, I wanted the smallest image that would state my name and give the copyright date. I wanted a high-quality font, readable text, yet something that didn't distract too much from the photo. I used the following command to create my watermark image: convert -background LightGrey -fill Black -font ./TimesRoman.ttf -pointsize 14 label:'Copyright © 2008 John A. Weeks III' watermark.gif This command resulted in the following watermark image:
The convert command creates the smallest image that will contain the text that is in the label statement. It knows to use 14 point text based on the -pointsize statement, and it knows to use the TimesRoman truetype font based on the -font statement. I located the TimesRoman.ttf file on my Macintosh and used it on the Linux system where I created this watermark image. You can use any font, even built-in fonts, but since fonts differ by machine, I decided to pick my own font, and create a local copy. In general, TrueType fonts will give the best results. The background is done in gray based on the -background statement, while the text is done in black based on the -fill statement. Finally, the convert statement knows to save this image under the filename watermark.gif since that is the first filename listed on the command line. There are an infinite variety of things that you can do with the convert command, so feel free to experiment and try different examples that you see on the web. This set of command options seemed to work the best for me, so perhaps others will find that to be a good starting point.
Apply The Watermark
I used the following command to apply the watermark to a given JPEG file. The composite command automatically adjusts to a wide variety of image formats, so it does not matter if the input files are JPEG, GIF, PNG, or any number of other less common formats. composite -gravity southeast -dissolve 65 watermark.gif myimage.jpg myimage.jpg The composite command joins two or more images into a new image based on the command options that are given. In this case, it takes our watermark.gif image and joins it with a sample JPEG file called myimage.jpg, and puts the output back into the same JPEG filename. The -gravity command tells composite to put the smaller image in the southeast corner (lower right) of the larger image. The -dissolve flag says to dissolve the first image, our watermark, to 65% of normal. This allows the background to show through a bit.
Example Of The Results
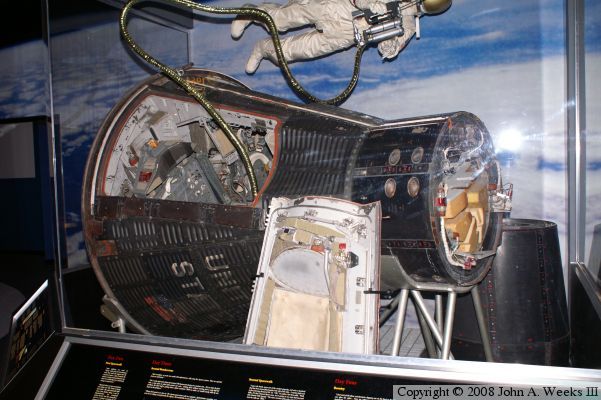
The watermark shows up in the lower right side of the image. The light
gray is enough to set off the black text, even when shown over a black
background. The image dissolve command lets the background image show
through the watermark.
Automate The Process
Example #1 — I upload all my images to a folder called 'new' on my website. This allows me to do the watermarking, and then move the photos to their final locations when I am ready. Here is a shell script that watermarks all the files in the 'new' folder located at the root of your home directory:
#!/bin/sh This script uses the find command to make a list of all the files in the new directory, then uses a for loop to step through each file name and run the composite command. The advantage of this script is that it does not run in your main web area under ~/public_html or ~/www, so there is no chance of messing up your website in some unexpected manner. If there are other types of files, such as html, in your new directory, composite will simply pass over them as an unknown image type. Example #2 — You may want to watermark an entire website, but at the same time, skip some images. This method creates a list of image files, which you can then edit, and the final list is watermarked. First create the initial list of images. While this example looks for jpg files, you change this to look for any type of image. Note that Linux is case sensitive, so jpg and JPG are not the same.
cd /home/account_name/public_html Next, use your favorite editor to delete any image names out of this list that you do not want watermarked. You can edit with vi or vim on Linux, use a Mac file editor, or pull the list back to your workstation and edit it there. Once you have the final list edited and uploaded (if needed), run the following script to watermark the specified files:
#!/bin/sh When the script is finished, run through some pages on your website and make sure everything worked as expected. It might be good to make a full backup of your website before attempting this kind of change, or work on a copy of your website until you are confident that things will work as expected. Finally, do not watermark your original copy of your images. Always keep at least one copy of your originals for future use, and only watermark the copies that you put online.
|
|
|
Authored by John A. Weeks III, Copyright © 1996—2016, all rights reserved. For further information, contact: john@johnweeks.com
|